
Before I begin this post, I’d like to say how today was total providence!
I began this project around 9 am as overhead clouds hung low and fat with a promise of rain. After having THE hottest summer in recorded history, getting a day like today to work outside is truly a gift. As I labored away, which you will see below, I would often stop and look up with a ginormous grin on my face as fat drops of water pounded my face.
Exactly when I took my very last photograph after finishing this project, the sun popped out around 2pm and the heat came back with a vengeance. Just as I was slipping in the front door to sit in front of my many fans. My feelings can best be summed up via the masterpiece film A Scanner Darkly, based on the Phillip K. Dick novel. See it. Read it. Now.
I’m calling this a sign that today’s post was meant to be. That said, let’s begin.
My coastal coral tree, which I’ve written about a few times here, has proven to be quite the fast grower. Every year it doubles in size. Much to my immense pleasure. Here it is as a young pup. Also, this specimen was from a branch cutting . You can learn how to propagate coastal corals right over here. Or how to prune this tree over here.
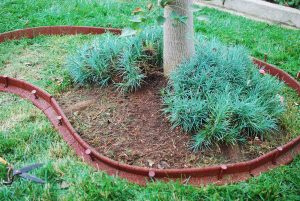
It’s grown so damn fast that the paltry tree ring I placed lovingly around it is now dwarfed in only two years. It looks like a poor geisha girl with feet bound and shoes too tight. That, coupled with some incessant crab grass, has caused me to want to remedy the situation. Just look at this unsightly mess!


Good lord! You can’t even see the ring any more! Something must be done to free up the tree trunk as well as the carnations surrounding it. In case you’re about to cast judgment upon me for the length of my grass, rest assured it is completely intentional. This summers experiment involved some tight state-mandated water restrictions because of our continued drought.
I am proud to say that I’ve maintained a lush and healthy green lawn ALL season long. Using about 30% of the water I used in previous years. The length of the grass is all part of the experiment. A rather successful one at that. Interested in learning more? Go here.
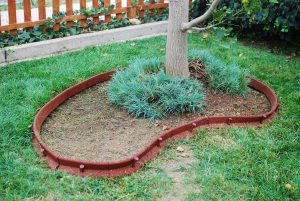
But let’s get back to our new tree bed shall we?I was hemming and hawing over what material to use for the border. Everything is so expensive when you don’t live near any field gathering spots for rocks. So I opted for a more eco-friendly option. A border made from recycled car tires. The company is called EcoBorder and I thought this might be a more cost effective and more handsome border to use. The sections connect to one another and they come with stakes to hammer them into place. I really love this product! For now at least. We shall see how it holds up to this California sun!
I began by laying it out in the rough design I wanted to use. You gotta love the overdone bean shape right?! Yes, you gotta!

This helped me get a good idea of placement as well as leaving a visible mark on the tall grass so I’d know where to trim. I then took a weed-whacker to the entire lawn (because it needed a little trim) and really chopped down the area that would be the inside of this border.


I took it down as far as I could to make the next steps that much easier. Take a moment to admire that thick and healthy grass! I’m so proud. Now it’s time to reintroduce the border and begin cleaning up.


Here’s a detail of how the border attaches together as well as gets staked down into the ground. Take a step back and you can see that the next step is to remove the old border and begin working the soil a bit.


Removing the old border was a breeze. As I worked my way around the tree removing it, as well as crab grass, it seems I disturbed a certain resident. A beautiful California Alligator Lizard (Elgaria Multicarinata)!


We played a little game of chase around the coastal coral as I worked and he fled. For the remainder of the project, I was ever vigilant to not startle or harm the little fella. After all, he was working away at pest control for no charge! Free labor is always the way to go. Speaking of free labor, the next step was to remove the grass, and I could think of only one critter that was born to peck and scratch. That’s right, our little heroine Piper the Silkie.


Such a little helper. Removing the grass brought all manner of insects to the surface and she stuffed her fuzzy little face.
I should note that I’m using old soaking wet cardboard as a weed barrier, so complete grass removal isn’t essential for this project because you can simply lay it over the grass and it will all die off giving the soil a nice little nitrogen rich humus. However, my compost bins are very carbon heavy at the moment and I need a good source of nitrogen to help balance everything. So I was harvesting more than cleaning if you can dig it. I knew that you could.
So Piper and I worked our way around the tree.

I also made certain that all the grass and roots below the border were removed so that nothing would slip through my weed barrier for quite some time. I’ve learned my lesson regarding shortcuts and improper bed and path placement. I’m still paying for these mistakes to this day! Don’t be like me, do it right the first time.

All systems are go for a wet cardboard party! Huzzah! Ain’t no party like a wet cardboard party…except, um… every other type of party.
I always keep any piece of cardboard I get for my battle against the weeds. Thanks Amazon Prime for all your donations. When using cardboard or newspaper as a weed barrier, the key element is to soak it thoroughly. I like to use a garbage can and then recycle the water in my planter beds. It’s important that the barrier is soaking wet so that there can be a transfer between the surface of the ground and underneath the mulch. We want a light barrier not a water barrier! Very important.

You’ll also want to remove any plastic labels or tape that will only impede this water flow as well as never break down. I find it’s easier to remove after the soaking. Once the cardboard is soaked through and through you can add it to your new bed.

I let the cardboard peek through to the front of the border for maximum coverage and then trimmed off the excess with a box cutter.

I applied the cardboard on every square inch possible, especially underneath the horizontally growing carnation plants. That’s where most of the crab grass hides and mocks. Man, I do so hate the stuff!


For an added touch, I clipped a bit of Foxtail or Star Agave (Agave Attenuata) from my larger plant in the back yard and placed it in the open space in my new bed.


All you need to do is cut a X shape into the cardboard and plant it in the hole. This species will root very quickly so long as the ground is moist. I made sure to cut this clipping off with a few roots still attached to the main stem to help it along. You can also root it in water if you’re less impulsive than I. But truly, not necessary.
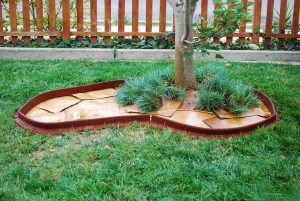
Once this was completed all that remained was to add the mulch. I added a super thick 4 inch layer to help keep that pesky crab grass at bay. In theory, this barrier should last at least three years before I’ll need to get back in there. At that point, I imagine the tree will be so large that I’d have to extend this bed even further. Here’s the final product ready to show off its added curb appeal.


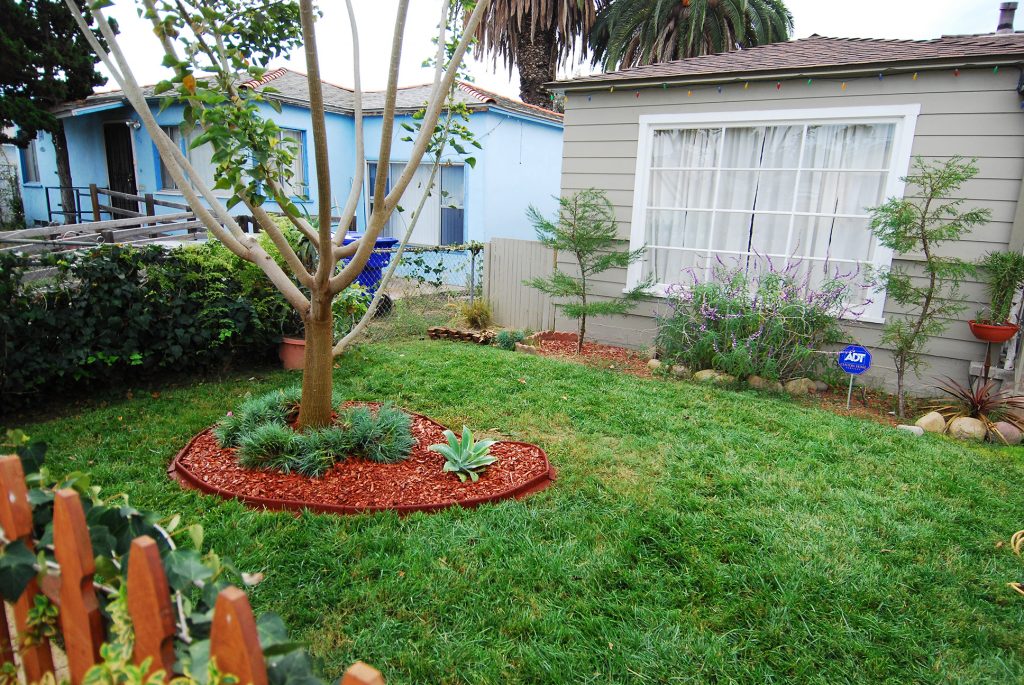

And for good measure, as well as a tree strength test, I decided to climb the coastal coral for the very first time. She held fast! All so you can have the following sweet birds-eye view of this cute little bed. How heroic of me to perform such a feat on your behalf! You’re welcome!
Speaking of feet, perhaps it’s time to wash mine. The fresh cut grass mixed with the dirt has resulted in the below hobbit feet. I always work barefoot and gloveless in the garden, it helps to connect me to my project and is good for the soul. I know, what a dirty hippy I am.


I hope you enjoyed this one as much as I enjoyed working on it. Please let me know if you have any questions about weed barriers as I have dabbled desperately down every avenue available! Just ask away in the comments below. I live to serve!
Cute!! Love it!! Nicely done!! Please check out my blog share your thoughts and follow❤️
Thank you kindly! I’ll take a gander post haste.
My thoughts are that your blog is for the ladies. So I shan’t follow, but I do think it’s super neat!
Love the idea of the cardboard – BRILLIANT!
Thank you sir. I laid some down on my garden paths two years ago and then added straw on top. Not a single weed has poked through.
I also have used the weed barrier you can get at Home Depot and have gotten weeds in the same season.
Long story short, save the money and recycle those old boxes! Or go dumpster diving.
If it’ll be for a heavy traffic location, it’s best to stake it down with those giant landscaping fabric staples to prevent slippage.
Yes, the weed barrier has been inadequate to say the least. And, we’ve got plenty of cardboard!! 🙂
Hooray, another convert to spendthrift gardening!
I have had weeds pop right through weed barrier fabric, too. I’ll try cardboard next time. Hate, hate, hate that crabgrass!!! Love the lizard!
You and me both! It pokes up like a spear and tears through weed barrier like tissue. Those bulb-like roots can lie in darkness for eons. Just waiting until you decide to finally rest weary bones upon hammocks. Then, bam! Your the mayor of crabgrass city.
The cardboard is a good tip
I ground myself daily on my walks around my property! You do feel better bare feet! Hippie! Yes join the club! I have a stack of cardboard and newspaper for just this thing. I maintain about 1/8-1/4 acre garden and it helps tremendously! And there worms love it! Your new bed is so nice. I love your fencing too!
Ahh, a kindred spirit! I love it. That’s a big ol garden you’ve got! My inner city living gives me slightly less room to grow. But I make good use of what I have! Thanks on the bed and fencing compliment. I wanted a fence that was a little more welcoming and classic. Built it all myself with a large learning curve applied.
I had a learning curve too when building mine. I have one more gate to build. 🙂 ahhh’s home ownership! Isn’t it lovely?!
If I had my way, I’d do nothing but home improvement and horticultural projects. I think I was made for the tasks. If I can only quit my day job…
Again a thoroughly enjoyable piece of writing, full of good humour, and photos to illustrate. Your end result looks lovely – another job well done 🙂
Why thank m’lady! I’m going to try to incorporate chicken slave labor into all future projects. It made the task so much more enjoyable. Plus, people walking down the street kept pointing and yelling “chicken!?”
Brilliant!!! and what a good neighbour you are James!
Love the cardboard treatment! Love the chicken. I can’t wait to see your tree blooming. And I am very jealous of your green grass. We don’t remember what green grass looks like up here. Thanks for reminding me.
It’s a rare sight here in San Diego as well. I posted a link above about my new method and it’s worked amazingly well.
Yeah, having Piper help with landscaping chores really bumps up the entertainment factor!
Is she friendly?
Piper is in love with me. She follows me all over the yard and gets ridiculously excited when I come out. She runs full speed and slams into my legs. It’s the most adorable thing ever!! So, yeah, she’s totes friendly. She also likes to beat up my large husky Sasha. A bold move for any chicken, especially one so tiny. I trained Sasha to protect the chickens, so she’s very patient. I think there’s a video on here where piper tries to steal sasha’s bone. It’s hilarious!
You need to get one of her greeting you it sounds like. That’s so awesome. Your flock loves you and gets along. It’s like you are Noah only with single animals and no boat and no bible.
Hahaha. It’s true. I pride myself on maintaining a harmonious urban farm. I may be building a giant ark, but that’s off the record…
It can be our little secret. When you get another husky and another cute little loving hairy chicken I’ll start asking questions.
Smart move! Off the record. Also, invest in an extra large umbrella. Soon.
Even better point. El Niño is coming and we need the rain.
I raid the dumpster at a nearby appliance store when I need cardboard. I have never wet mine though, just laid it down and covered with wood chips. It usually lasts at least two years.
It would depend of you have neighboring plants with surface feeder roots. Is the term transpiration? I can’t recall. But you want to encourage that to increase moisture levels. I believe.
since I live in Seattle (it rains ALL the time here) it isn’t an issue
Ha! I’d imagine not. In San Diego and during a drought it’s ALL about the water. I use my tears to wash the dishes. It’s a sad affair.
You have given me some great ideas this morning, I have let the front lawn die this summer, so now have a large canvas to experiment with. The ecoborder sounds like a good idea as well as the wet cardboard. Now if only the weather would cool off here (Northern CA.) Really enjoy reading your posts,
My dear Calista, this is exactly what I like to hear. Some contagious inspiration coupled with an appreciation for mirth filled writing. Now you’ve inspired me to keep at it! I have my days where I question if I should be working on this blog. It’s comments like yours that help refuel me. Thank you for that.
I was saddened and surprised on my recent trip to Portland to see how drought stricken it was all the way up there in mossy moist green lands. Not what I was hoping for at all. I needed a break from the SoCal heat and dry weather. I still do.
While working on this project that small amount of rain lifted my heart immensely and now I hunger for more. It was followed by two days of record heat and typical dryness. Ugh.
As for the EcoBorder, the one thing I loved about it was how it shapes and conforms relatively easily to the landscaping. I must admit that I am sold on this product. They were about $8 per 4 foot section but maybe can procured at a lesser rate on the Interwebs. I am a creature of extreme impulsiveness, so I often don’t make the time to be spendthrift. I’m working on it.
No I’m not. Who am I kidding. I love my impulsiveness. I have a poets soul and go where my heart leads. Proudly.
I love your attitude about having a blank canvas instead of a brown eye sore! Please let me know how the front yard develops! And send me photos as well as any questions you may have.
Thanks again for your warm and welcomed comment Calista!
Oh, also…Has anyone gone out and watched A Scanner Darkly yet? It’s your homework assignment. Yes, there will be a quiz next week.
Do you use just one layer of cardboard? I read that you are to use 2 to 4 layers to last 3 years. Can I wet it after laying it down? I am from Michigan, no water restrictions. Thanks
Good morning Tammy. There was two layers in the end for this bed. I don’t want to get too thick here in Southern California with our tiny amounts of rain for fear that it would be too dry.
You should water it after laying it down and keep it wet until the mulch is covering it. Then I’d wet the mulch on top. The goal is to create permeability of moisture while blocking the permeability of light.