
Ugh, what year is this? The holiday season always leaves me sluggish and lazy. My energies are mostly used up in seeking our my next meal or snack. My fridge is loaded with ham and pies and cheeses. All of which only serve to perpetuate my sluggishness. So, I’ve dragged myself out from under the stove to write a little something something about a time when I wasn’t so inactive. My flagstone patio.
When I bought my home, one of the things that drew me to it was the giant blank canvas that was my yard. I could sculpt whatever my heart desired. After I removed the huge fence that was cutting off my yard in half, I was able to better see what direction I wanted to take.
I had begun placing a few fruit trees and shade trees right away so that they could immediately begin growing tall and giving me my much needed fruit and shade. I began to “sketch” out foot paths all over the yard to try to envision the final look. Not an easy task, because you have to take into account how the trees and plants will look when they are mature.
One thing I definitely wanted to do was to reclaim any and all of the rain water that falls during the winter months. I had noticed from the bare dirt erosion that most of the water just ran down the slope that is my property and into the neighbors lot behind me.
I could see little rivulets where this was happening. Now, I love thy neighbors and all, but that water is better suited for my plants as opposed to their weeds. The spot I chose for the patio was the natural place to begin the process as it is at the top of the slope.
My plan was to soften the hard packed soil and carefully spread and level it with a garden rake. The first thing I noticed during the rains was the water just shot down the sidewalk along the side of the garage. What a waste! I needed to tame that elusive and rare treasure. So I began to sculpt a riverbed along side the sidewalk to gentle curve that rain water back into the heart of the yard and into my beds.

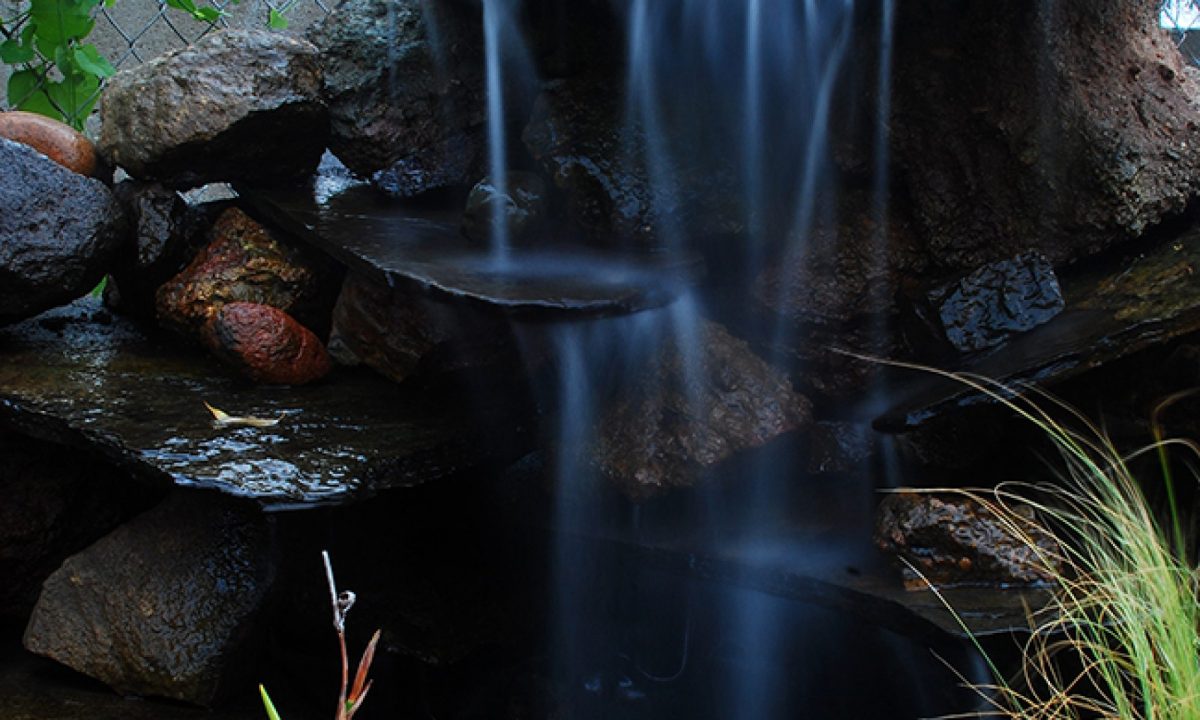
You can also see the waterfalls taking shape on the left. More on that in a later post! While I was working on this project, it would rain from time to time. Which was perfect because it allowed me to see the results a bit, but it also served to loosen the soil to make the job a bit easier.
I decided that I would leave the grass alone for now, but would return in the future to create a more natural looking border instead of the hard line you see today. One thing at a time when you work as much as I do.
I could see from the “test” rains that the dry river bed was working as it should so I proceeded.

All of those rocks were reclaimed from the hill I was removing in the back left section. Meticulously hand picked in between wheel barrow fillings and pick axings. Part of this project included moving the soil to the very back of the property as a berm to keep all the water on my property. This is not only convenient for me, but also the responsibility of every homeowner. Water run off can cause major erosion damage issues as well as transfer chemical fertilizers into places they shouldn’t go. Not that I use that poison anyways, but even natural fertilizers can add up and wreak havoc to ground water supplies. I’d like to say I was trying to be a good neighbor, but I was mostly inspired by saving money on the water bill. Money, you fickle temptress, you rule me so.
The leveling of the ground made it such that instead of the water running West towards the back of the yard, it ran North/West right into the dry riverbed! Then it dumped into the flower bed in the center, and then into the next flower bed and so on. I built small channels for the water to travel in and then filled them with gravel. Now I was able to turn my attention to the patio itself. I wanted to have a nice little fire pit in the center for those cold SoCal nights (sorry Buffalo peeps), so I placed that first to build around it. I went with Arizona Rosa flagstone for a few reasons. It’s warm reddish colors would be pleasing to me, it was an absorbing sandstone so they wouldn’t be too slippery when wet, and lastly and more importantly, I was able to get a great deal on them. Okay, let me be honest, that was the only reason. I have a friend who does landscaping and he gets a discount at the stone quarry. He and I pretended to be landscaper and client and went in to the quarry under the pretense of a lie. I’m not ashamed, that shit is expensive! I pride myself on the fact that I’ve not spent that much on supplies for all my projects. I barter, trade, garbage pick and schmooze my way through every deal! For the flagstone, I got a nice 60% discount. It was still $200 though and it really hurt my miserly demeanor none the less.

I apologize here for not having more photos showing each and every step. I wasn’t blog writing at the time, so stopping the work every 5 minutes to snap a shot wasn’t a priority. So sit back, close your eyes, and imagine the fire pit being installed and the first several flagstones being placed. I’ll wait…
That was fun wasn’t it!
What I did was lay out the design I wanted in the stone. Then I redid it. And a third time. If I were a more meticulous landscaper, I would’ve laid down a weed barrier before hand and then added sand to make the leveling and setting of the stone both firmer and weed free. I am not always that meticulous and as a new home owner often make mistakes (like right here for example). In hindsight, it’s not too bad having little plants grow between the flagstone. I have added a few poppy seeds so at least the plants aren’t all weeds! Each stone then had to be perfectly level to follow the North/West flow of water I wanted. They also had to be making full contact all around and underneath so they don’t shift and crack over time.


And just so you know, I did return that cart from the Home Depot. It was a temporary loan from them that they maybe didn’t exactly know about. They’ll get over it I’m sure because they get about 40% of my paycheck anyways. Now that I think about it, I should’ve kept it!
So, the laying of the flagstone meant I had to set it in place, then lift it up to see where the air pockets were hiding. I’d sprinkle a little sand and then set the stone again. This went on about seven billion times per stone. Give or take a few billion. You could actually feel when it was set properly more so than see it. It just felt firm and unmoving when it was wiggled. I then tamped in the edges with my powerful fists and finger tips. Demonstrating this to Nury must have impressed her greatly, although she doesn’t talk about it as much as I hoped. Perhaps she is too impressed for words. Yeah, that’s definitely it!
I wanted to do something a wee bit different for the area around the grill. Just to set it off a bit from the “social” area of the patio and make it known that this is the area where delicious meats would be grilled and all novices best stay upon the civilian portion of the patio.

Once all the big stones were set in place, and I was happy with the layout, I had to decide what to do with the spaces in between the stones. I didn’t like the idea of using cement due to its semi-permanence. I also didn’t want to leave the sandy dirt there either. My first experiment began by using the reclaimed smaller stones form the hill removal. It looked great, but didn’t hold up to heavy traffic.


It turned out that after a few BBQs many of the stones were kicked out of place despite the methodical tamping done during installation. If they were set in with cement, they would’ve worked perfectly. I may return one day and do just that, but for now I wanted this to be a moveable feast. I instead opted on simply using pea gravel to fill in the spaces in between. It worked out fairly well even if I do have to sweep them back into place every now and again.

Here you can see where the patio, the dry riverbed and the edge of the lawn meet. There is a deeper channel along the entire edge of the grass filled with river rocks so all the irrigation off of the lawn dumps directly into the riverbed. It’s been over a year now and it still is working like a dream!
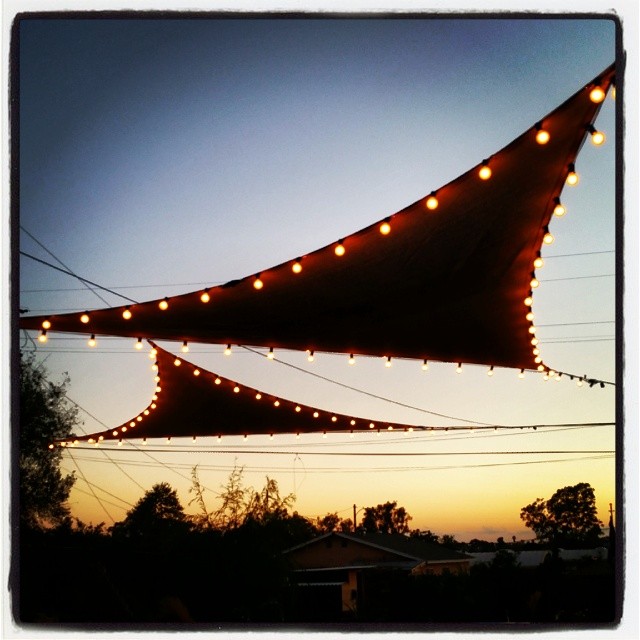
I added a few solar shades over the patio to get some rest from the hot summer sun. That’s a whole other story getting those bastards to stay up when the ocean winds are kicking up! I’m 6 miles in from the sea yet there is little to nothing that keeps those ocean storms from tearing through my yard. These solar sails have failed three times and each time they get a heavier gauge of steel wire to support them. I’m fairly confident that I have it right this time. Mostly.


When there’s a nice fire going, this patio space is warm and inviting. I am in love with the results and sit out here often with friends, my girlfriend or just me and the dog. Here it is today in all its glory.

Over the past year, I’ve been adding plants all around it. A lot of ornamental grasses and wildflowers. The winter rains have really helped to push up a lot of poppies throughout the patio and I get a bunch of butterflies and hummingbirds all the time. They love the waterfall (post coming soon) and take their morning baths in it while a sit and watch and prepare myself for another day of work. If anyone out there has any questions, or even any tips, I’d love to hear them! This was an experiment based on intuition and not experience. My rudimentary understanding of physics mixed with a cursory landscaping past may or may not have allowed me to do this properly. It is holding up quite well however, so I must be doing something right!
Feeling a bit sluggardly myself. A spell in the garden is always a good remedy.
Always this way during the holidays for me. Slow movin time. I indulge in it at least. Like a hibernating bear.
I find lately, I’ll walk in the yard. Look at something needs doing. Then mosey on back to the couch with a plate of ham and a shit eating grin.
Love the blog, James. Beautiful photography. Very impressive!
Thanks so much, I’m glad you like it! And thank you for following!
I stumbled across your blog, very nice work. I am curious about the ease/difficulty of cutting your lawn next to the river rocks. I certainly like that look more than some of the other edging options I have seen, I am just concerned that cutting that grass would be a pain.
Hello J.J., thanks for stopping by!! I use a weed whacker to trim the edges before hitting it with my push lawn mower. The river rocks are used to define the sloping dry riverbed that handles any rainfall (if that ever will come). They are actually lower than the grass is so using a lawnmower to cut the edge would work but may cut it too low.
As it stands now, using the weed whacker works really well and is super fast. The rocks are big enough to not be displaced by the trimmer so I can edge the entire lawn in a few minutes and it looks great.
During those lawn cutting times when I don’t feel like breaking out the weed whacker, I’ve used the lawn mover and just made it level as I passed over the edge of the grass. This is fine when you have a push mower but may be harder if you have a gas mower because of the weight. One solution would be to raise up the edge of the stones so they’re more level with the grass.
Oh, and one more thing I must share with you and everyone else. DO NOT do what I did and skip the weed barrier!! I’ve regretted it ever since and am now having to redo much of the pea gravel adding a barrier underneath because the weeds get out of control. I kick myself for cutting corners almost daily!
Initially, I thought I could grow some mossy greens in between the rocks, but everything just drys out in this drought and I get this brown ugly scaring all over. Then the weeds come in and it happens all over again.
The sections where I added the weed barrier first have been pristine for almost a year now.
You can read about my woes here:
https://mindyourdirt.com/2014/11/16/to-err-is-human-to-redo-is-annoying-how-to-not-build-a-gravel-pathway-and-how-to-fix-it-afterwards/
learn from my mistakes!
cheers!