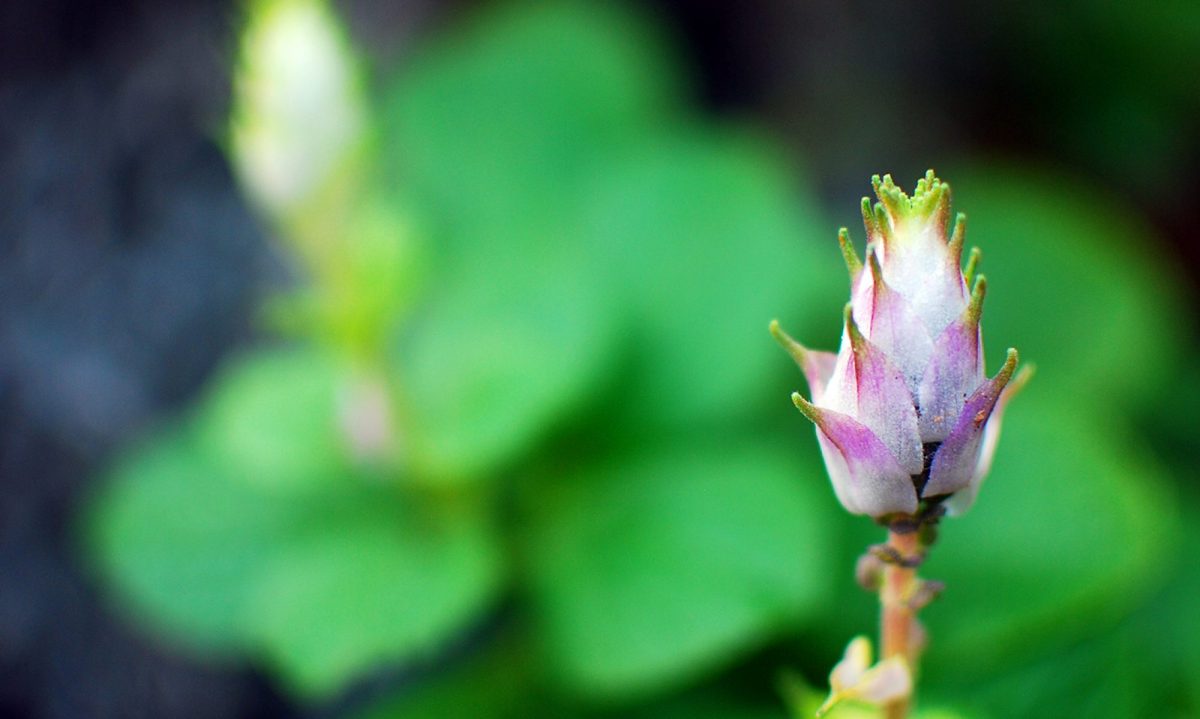
I’ve been in love with the Erythrina Caffra (Coastal Coral) tree since I first laid eyes on one in full bloom. They have them scattered throughout San Diego near highways and parks and the like. This tree drops all of its leaves simply to allow the flowers to grow unimpeded and in full view for pollinators and tree minded people like me. Just look at that color!

Via
Older specimens have one the most amazing trunk and nebri of any tree I’ve seen. Like most African trees, it’s adapted to life in hot and dry climates. It’s canopy is shorter and wider as a result. I’d imagine as a way to keep the soil temperature down and the moisture levels up. But I am only speculating. I love that short wide profile. And the flowers are amazing as well. Great hummingbird attractors.

Even its seeds are a brightly colored marvel.

Via
So, I’ve observed it from afar. Then I coveted it from slightly nearer. Then, I got bolder and snipped a wee bit of it. I tried to propagate it from small green cuttings from the tips of the branches. I did about 24 of them in a small greenhouse. None of them took root and many began to rot. I could’ve used the seeds, but I originally wanted a bonsai of one so it would’ve taken way too long to get the trunk development I would need. Bonsai is an art of patience but it can also allow for a few shortcuts. One of those shortcuts is to start off with a more developed trunk.
I scoured the Interwebs for hours looking for cutting propagation techniques. To no avail. Then I stumbled upon a PDF put together by some remote horticultural school in some small farm community somewhere in nowhere USA. The farmers were using coastal coral trees as natural fences and had a technique to quickly propagate large six foot branches! It was absolutely perfect and if I could find it again I’d ink it here to give these saviors proper credit.
I’ll give you the gist of it below, but if you’re looking for a much more in depth tutorial on how to propagate this species step by step with lovely photos, then check out this article on the subject! For now here’s a quick rundown; basically you remove a large five to six foot branch with a 2″ diameter from the host plant. I did this in a rather illegal fashion from a local park. I picked a part of a large tree that was densely overgrown and near the top of the tree so no one would miss it, but if I got caught it would’ve been trouble!
So…don’t try this at home!! I am a highly trained tree ninja invisible to prying eyes of the man. So, seriously, don’t ever do this! I know how to properly prune a tree and even applied a wound healing ointment after I made the cut. This is still no excuse for this form of illegal field collecting and it’s not something I have done since! PSA complete.
The whole time I was up in the tree sawing away in broad dayight, there was a wayward hobo napping underneath. He never stirred. Even as I descended with my six foot bushy prize. I then dropped the rag top and stuck it in the passenger seat and quickly made haste to secret lair or The Plant Cave.
Next I did what seemed counter intuitive, but was called for in this long lost ancient scroll in PDF form. It said to lean it upright against a wall in a cool dark place like a shed or garage or basement. And then just leave it there for about two weeks. So I did. Even though I was sure I was just letting it die. You see, the sap had stop running and the cut needed to dry out or else it would have rotted. Just like my first 24 attempts did.
Then, I began removing about 75% of the leaves. They would all die off anyways an I wanted all the energy stored in this branches remaining sap to be used for root propagation not feeding leaves that are already not long for this world.
Next thing you need to do is gently and carefully score the bottom twelve inches of the branch, about eight to twelve cuts all around the base of the branch. It’s important that you only cut through the bark and not the inner Vascular Cambium when you make this score. See the diagram below for where that is. If you cut past into the sapwood, your branch will never form the roots it needs to be properly cloned. So, it’s important you dig?

After the second surgery, my branch was ready to become a tree. An exact clone of its host plant in an undisclosed park in an undisclosed city harvested by an undisclosed tree ninja. I planted it with a 50/50 mix of organic soil and pearlite. I kept the soil moist, but not wet, with dry periods in between lasting about three days. Then, after only a month, the first tiny little leaf formed. Then another and so on and so on. I began to water it more regularly and it just took off in the pot.
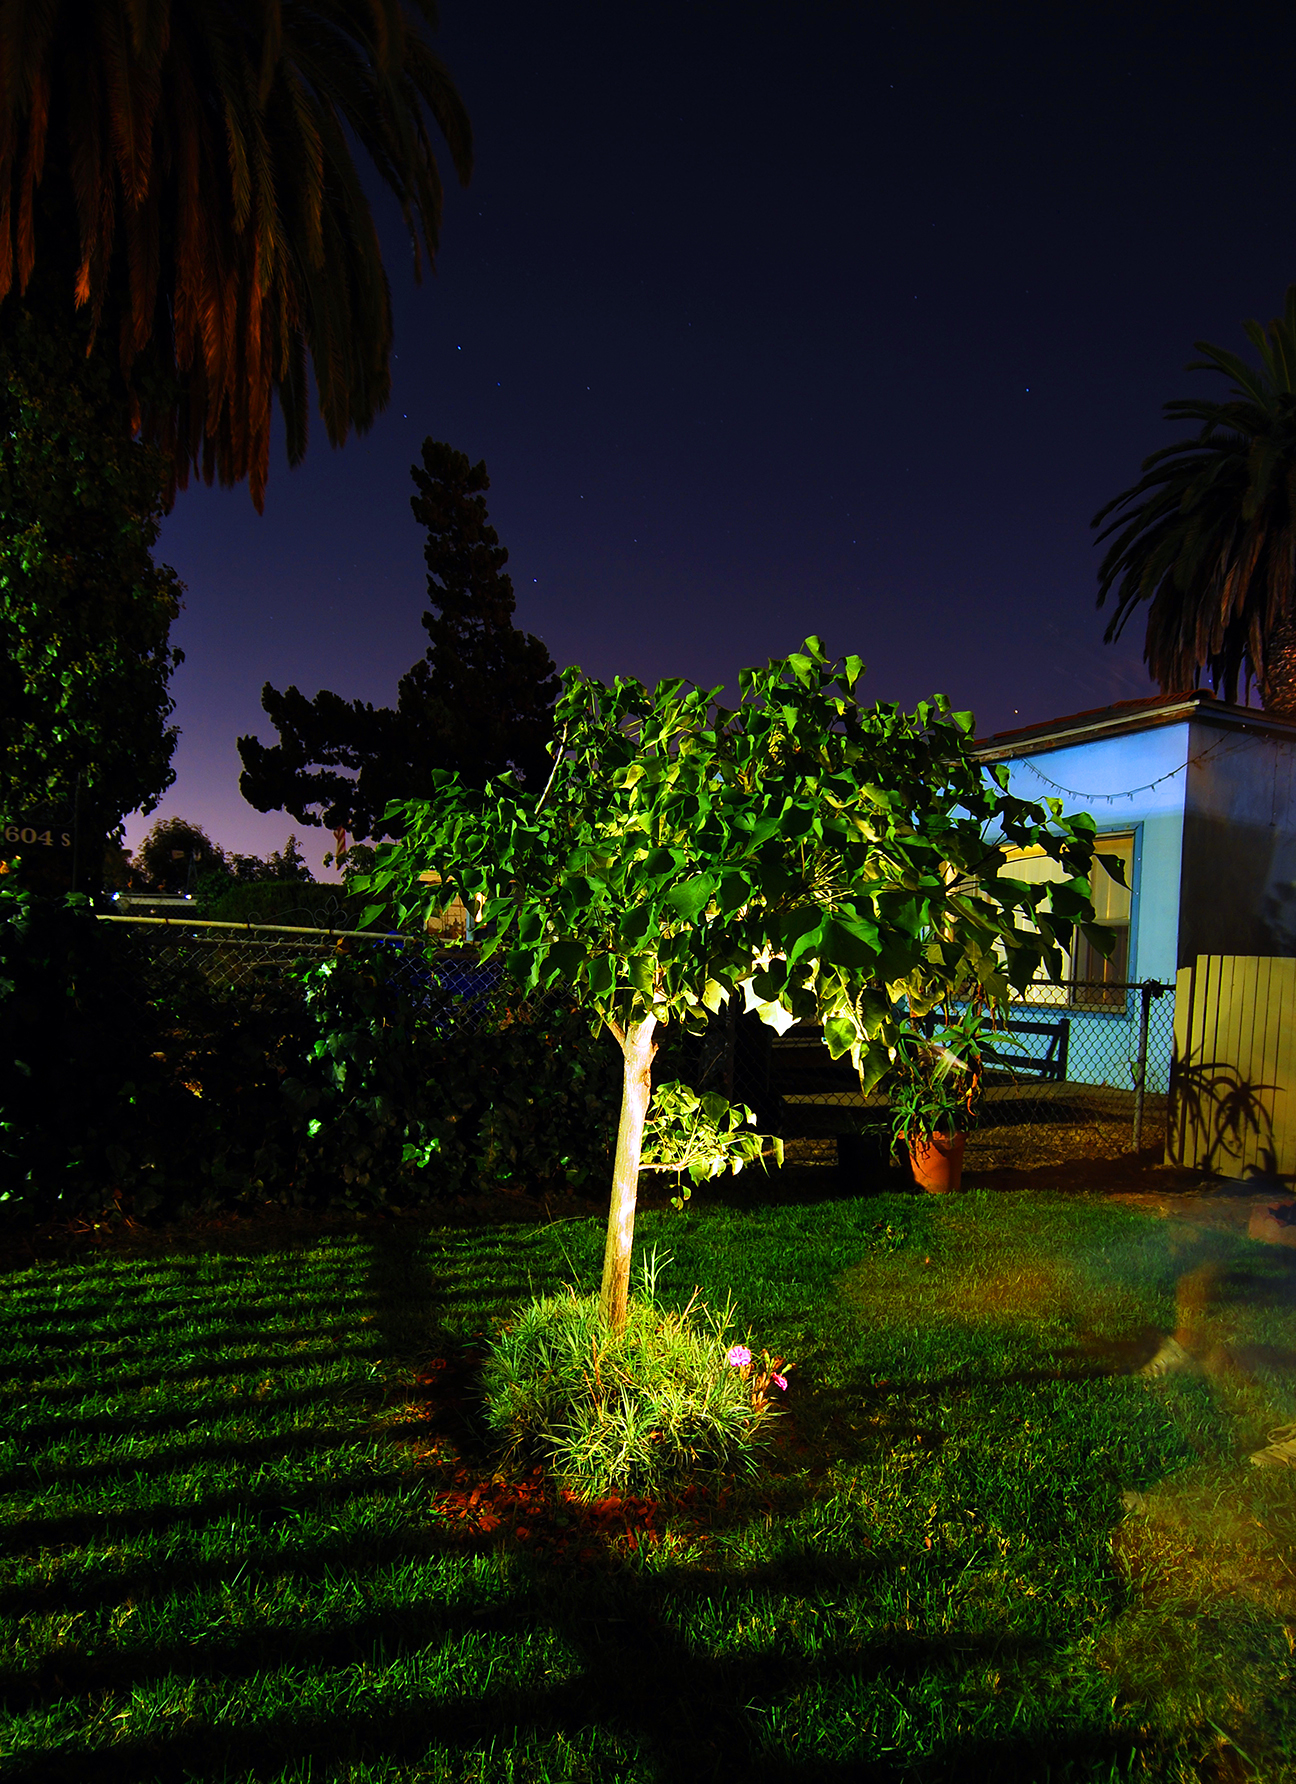
Then I bought a house which had no trees on the entire lot. I decided that this tree would no longer be destined for bonsai, but instead should be used as a stately medium sized tree on the front lawn. It was the first thing I put into the ground on my property. So it was done with a small amount of reverence and ceremony while my disinterested friend Kevin watched.
Here it is in April of 2013 as it tries to bounce back from all its stresses and tribulations.

As you can see, you can barely see it. Well, as you can’t see rather. This was during it’s flowering stage and it hadn’t begun growing its leaves yet. I figured it was a good time to get it in the ground before the sap began to flow. I added some tree fertilizer spikes around the outer edges of the canopy and hammered them into the soil. Seven months later, it began filling out nicely.

Then, something crazy happened. Just as the title of this post implies, the damn thing had a crazy growth spurt. It grew more than twice its size during last summer. I’m not sure if it was the fertilizer or the lawn irrigation that did it. Perhaps it was the great reverence and ceremony in which it was planted. Either way it exploded. But not in a way that I would expect. It grew outer branches super high and the original canopy kinda stayed the same?! Really blew my mind. The trunk diameter more than tripled and the outer branches reached for the heavens, but the center stayed put. Check it out for yourself.

It’s crazy right? The thing just hulked out. Now I don’t know if this is normal growth for a coastal coral or not, and if someone has any experience with these, I’d love to hear it. Here’s a detail of the old and new growth from this last season.

The new growth’s branch thickness is the same as the original trunk thickness was last spring! So something is going very right with this very happy tree! I can’t wait for the rest of it to catch up so I can have my beautiful stately curb appeal trophy tree. I can already picture the little rope swing hanging from its branches!
Very nice indeed – I remember seeing lots of these on the beach near La Jolla….
You can also grow Plumeria (frangipani) the same way, and they will do very well in San Diego’s frost free climate.
In warmer parts of Australia, they were popular in parks as well, but they hard a very invasive and destructive root system (lifting foundations, paths and the like) and as they get older, they almost always suffered from sudden summer branch drop, so most have been cut down.
My advice would be to look at the original tree and get a solid feel for the shape/height and branch structure, as that is where your cutting will roughly end up…now as this tree does not compartmentalise decay well (which is why it can drop whole limbs without warning), it is important that you do formative pruning while young which will help train the tree and stop that risk. So look closely at any very deeply forked branches; these are typically weak points, and the tree may benefit from having some of those shortened/removed while the tree is young.
But that tree certainly looks healthy and happy, and almost a perfect vase shape – kudos!
Hey thanks Matt! Really good to know. When I was studying this tree as a bonsai specimen, I did a bit of aggressive pruning initially. However, there is still two branches that are deeply forked as you’ve warned. I’ll revisit that to see if it’ll be an issue. Thanks again!
I am interested in planting a Coral tree in a large concrete pot (14x16x19). Would the plant be happy there? We live in a hot dry climate.
Awesome write up, thanks for the info! What time of year did you make your cutting and does it matter? Were the scores around or along the branch?
I cut the original branch in the summer. I’d imagine spring might be better with the sugars rising from the roots, but I’m fairly certain it doesn’t matter. Mine took off just fine.
When you make those scores into the bark, do so along the branch. Make sure the razor or knife is sterile to avoid any bad bacteria in the wound.
I was surprised on how well it took root without any rooting compounds. You shouldn’t have any issues as long as you let the branch dry out first.
Thanks! Been thinking about doing this for a while—plan is to keep it as a potted patio plant and see how it fairs, someday I’ll have some land to plant it in 🙂
Beautiful trees and yours is looking great!
Mine did well in a pot for a year or two. Make it a larger one and you should be just fine. It’s a thirsty tree, just so you know.
It flowered nicely in a pot as well. Let me know if you hit any roadblocks along the way, I’m here to help!
Hi
Thanks very much for all the explanation to re-grow the coral tree.
I am from Mozambique and love the coral tree. Unfortunately I did not know that the tree had a very aggressive root and I planted it just below my window in a house I have in Inhambane (Tofo beach) . When i got the plant I was under the impression that it was another type of tree. Only when it flowered (after a couple of years) I was in chock. This was the tree I wanted for so long and did not know i had it. I must say it took a good 4 years to flower. Maybe it does not like the sea air but it always looked very healthy and green. Last Christmas I had a visit of some friends from south africa and one of them told me I had to remove the tree as soon as possible from that place because it would cause serous problems to the wall and my bed room floor. I was also told the after i remove the tree I must make sure the roots are all killed or they will re-grow from under the house. I shall be going to the house sometime next July to do this. I already know how to cultivate it from the branches but I need to make sure it does not grow again from any remaining roots that may remain in the grown. Can someone help? I must say, my heart is so small…..I really did not want to do this, but it seams i have no choice!
English is not my language, sorry for any mistakes.
regards
Dear Madalena,
Firstly, your English was just fine! No worries there at all. Thank you for your comment and it is true that the coastal coral needs to be placed somewhere where it’s wide base and roots won’t cause damage. But that doesn’t solve your current dilemma.
How big is the tree right now? If it’s still relatively small, it can be transplanted and moved away from the house. It may take year to bounce back, but they are very hearty trees.
If it’s transplanted, I would find it very surprising if the roots send out new shoots from the old location. Especially if you’ve dug it out properly and kept the main root ball with the tree as you moved it.
I know that they have stump remover products for trees that are simply cut down if moving it is no longer an option.
Either way, I think a few shovels and pick axes and maybe a chainsaw would take care of your problem. Do you have any photos you could email me so I can get a better idea as to how big the tree is?
Perhaps together we can come up with a solution that saves both your house and your tree!
I’m here for you Madalena and we’ll figure this out together!
yours,
James
The leaves are good for the lawn let it mulch away
Agreed! Although my mulch pile gets most of them. But then it all gets returned the following spring.
What is the best growing medium for a propagated 3 ft cutting? It has rooted & has just sprung leaves but is in a 3g pot. I want to transfer into a much larger pot & place on the patio for a couple years. I know these are drought resistant & do not need/like fertilizer? Regardless, I am in zone 9 in SoCal desert. The Coral cutting was given to me from a nursery in San Diego (Kniffings).
I used you “drying method, cloning powder, 1 nice watering after sticking in a 3g pot with store bought premium potting soil. I kept it inside for about 3 months & figured it wasn’t going to take.
I moved it outside in the shade & allowed 1 hour of early morning sun. As the temp heated up & no change at all to the cutting, I figured it was over. i just left it there…..gave it a few mists of water & I think 1 cup here & there of RO water. Low & behold, 6 weeks ago I noticed the stalk was still green. I thought it was slowly dying. Then to my amazement, I noticed buds forming along the top branches. It is only 2 ft or so sticking out of the pot but the soil end of the cutting is about 1 1/2 ” thick. When I saw leaves shooting out, I moved it inside. Temps were up & over 100 degrees. It is pushing leaves steadily & I have it under lights. Some of the leaves are wrinkling or slightly wilted with a yellowish-green hue? I imagine it needs to be transplanted to a bigger pot?
Thank you for your responses & your wisdom!!
Coral Tree ‘Madness’,
-Raul
Hi Raul! I know this feeling well. I’ve found that when I finally say, “Oh well, this one didn’t take”, the thing finally begins to bud. Now I mostly ignore them until I see growth while passing by.
I’m so glad my article was helpful to you! This is one of my favorite trees and I just put a second one in the ground in the back yard and it’s doing well. Future shade tree for the summer heat! Although, based on the host tree, it shouldn’t take more than two years to explode.
As for yours, I’d think that if buds just appeared six weeks ago, it’s too soon to repot it. I’d wait until the end of winter and let it get strong in the pot it’s in now.
It may be getting yellow from not enough sunlight. Or too much water perhaps. My potted clippings around the same size were out in full sun during last summers blazing heat. It dipped over 100 many of those days. That’s the one I just put in the ground, and as I mentioned, it’s thriving.
I did let the soil dry out before giving it a deep watering though. How often are you watering?
As for soil, I use a mix of about 75% organic sandy soil with 25% pumice and it seems to like it. Although I imagine you can be flexible with the soil content with this species. Very hardy.
I’d move yours back to its original outdoor spot and keep an eye on the soil moisture. It could also be yellowing from the shock of moving it indoors. If it gets really hot, just make sure it doesn’t dry out completely. But it should be able to handle zone 9 quite well. If it finally formed buds in that location, it should be happy there now.
Is the porch location one of similar shade? If so, maybe try it there. Whatever you choose, I’d avoid moving it around too much as that can stress it out. But fret not, I’ve had clipping yellow and lose all its leaves only to come back again when I left it alone. If it’s stressed right now, repotting it might to more harm than good.
Find a good permanent home for it and let it bounce back again. Then at the end of winter before new growth begins, repot it in your five gallon and leave it in the same location.
Enjoy your successful cloning!
i love all of this so much. i am planning this ninja operation. i know a place where they grow in LA.
Godspeed Von Tang! One should never pilfer, but if one did… Do so with reverence and consideration to the host tree. And don’t get caught!
Let me know how the operation turns out please. So far, I’ve been getting some good feedback about this method being successful. I’ve just put a second tree in the ground and have three more in pots. All from the original Ocean Beach host tree
Going to give it a try with a bonsai I’m abut to prune. Thanks for the info.
Do you have a bonsai coastal coral? Pruning bonsai is a little different than pruning a tree in the ground. What species do you have?
I live in FLORIDA now. I had one when I was in California and lost it in a Santa Ana wind one year. I’ve missed it ever since. WHERE can I get a cutting, starter anything?! I love this tree.
Hi Brian. I’m not sure about sources in Florida for you. I can ask around though, I have some friends there.
If worse comes to worse, I can mail you some seeds from my tree though. Not as fast as a cutting, but at least you’d be on the road to having another one.
Call around to some local nurseries and if you’re aren’t having any luck, let me know and I’ll ship some to you.
Do you remove the leaves and make the cuts before you leave it for two weeks, or after?
I assume the cuts are vertical?
Thanks for this!
Hi Karen. You want to remove the leaves before you store it. That way all the sugars get locked into the branch and not seeped out into leaves that will dies anyways. The branch will need all the sap it can get to form new roots in a couple weeks.
The scoring of the base should be done after the two weeks and right before you plant it. The scores will run parallel to the branch. So vertical if the branch is upright.
It’s my pleasure! I’m glad people are getting into this beautiful tree and are rooting their own. Best of luck with yours, and feel free to check in if you have any more questions! I’m here for you.